Friday, August 30, 2013

Gluten Free Play Dough Recipe (with photos)

Did you know that Play-Doh (by Hasbro) and contained wheat? Many people don't, which means that many mamas wind up with sick kiddos after a day at school and have no idea why!


From the Hasbro FAQ page. Click image to enlarge.

And get a load of this...

Click to enlarge

Yes, even Crayola dough contains the 'ole wheat culprit!

The information above was taken from the Hasbro and Crayola websites, confirming that our beloved Play-Doh, as well as the Crayola dough, do contain wheat and are not safe for some of our children. But, geez, we all remember the good old days of rolling dough balls, creating anything our minds could conjure up - cars, houses, characters, even entire cities! I mean that was fun, right?!

Image from hasbro.com
Image from crayola.com

If you have a child with a wheat or gluten allergy and did not know that Play-Doh or Crayola contained wheat, I'm sure this news is shocking. At least it was for me. I mean whod'a thunk it? Seriously, you mean it's not just the heavy monitoring of food that we parents have to tackle to keep our kids safe? The answer is no. We must also monitor the products they play with to ensure our wee ones  are protected from the allergy demons lurking at every corner. Just to be safe, as you stock up on craft & school supplies, you should check out this comprehensive list Heidi over at Adventures of a Gluten Free Mom has put together that gives an account of products with and without allergens. It is a God send!

Photo from ucreatewithkids.com
So...if your kid is allergic to wheat or gluten, be sure to let your child's teachers know that she is to steer free of Hasbro's Play-Doh and Crayola's Dough. If another brand is being used, be sure to check their ingredients to make sure the product is safe. If the ingredients are not known, ask the teacher to find something else for your wee one to do while the other kids engage in dough play.


All is not lost, however. As you know there are many websites online that have recipes for gluten free play doh. I personally use the one from the Parents website. You can find it here, but I will also include it below.


If you're like me and your child has multiple (like a million) allergies, all of the making-everything-under-the-sun-from-scratch business gets quite overwhelming. One of the things I wish is that every site had pictures to go along with their recipes. I know, I know, it's asking a lot...that's why I said I WISH!!


One of the problems I had when I first made the play dough about three years ago was I did not know what to expect or when I was done! I felt unsure all along the way. I remember saying aloud, "Ugh I wish I had some pictures!!!" But I didn't. It was okay, though, even though I had some failures here and there the first few times I made it.


So...today, I thought I'd be adventurous and not only allow Ninja to help me make the play dough (it's his second time) but that I would also take pics along the way. Can you say headache? Yes, by the time the fiasco was over my exorcist head was spinning around on my neck, which...I suppose, is why I don't see step-by-step pics with every other person's recipe post, LOL!


We survived once again. My head did not fly off of my neck. And the play dough was another success. I hope my stress will not be in vain and that the photos will help someone, somewhere know they are doing alright as they take the journey to their first batch of gluten free play dough.

Here are the pics of the cooking phases. The recipe is immediately following. Please look through the pics and read through the recipe once in its entirety before beginning. That way you can take in the instructions, as well as my personal notes, and know what to expect as you proceed.

After 1 minute cooking time. Stir continuously.

After 2 minutes cooking time. Stirring is pretty easy at this point.

After approx 3.5 minutes cooking time. You will see it beginning to solidify in places.
Stirring gets a little sluggish.

After 4 minutes cooking time. You will notice the color getting darker where it is becoming solid.
Now there is not so much "stirring" but more like "flipping." Flip constantly.
Press the dough deeply with the spoon on each flip, to make sure it is getting heat evenly.

After 5 minutes cooking time. Keep flipping and pressing.

After 5.5 minutes. Keep flipping and pressing.

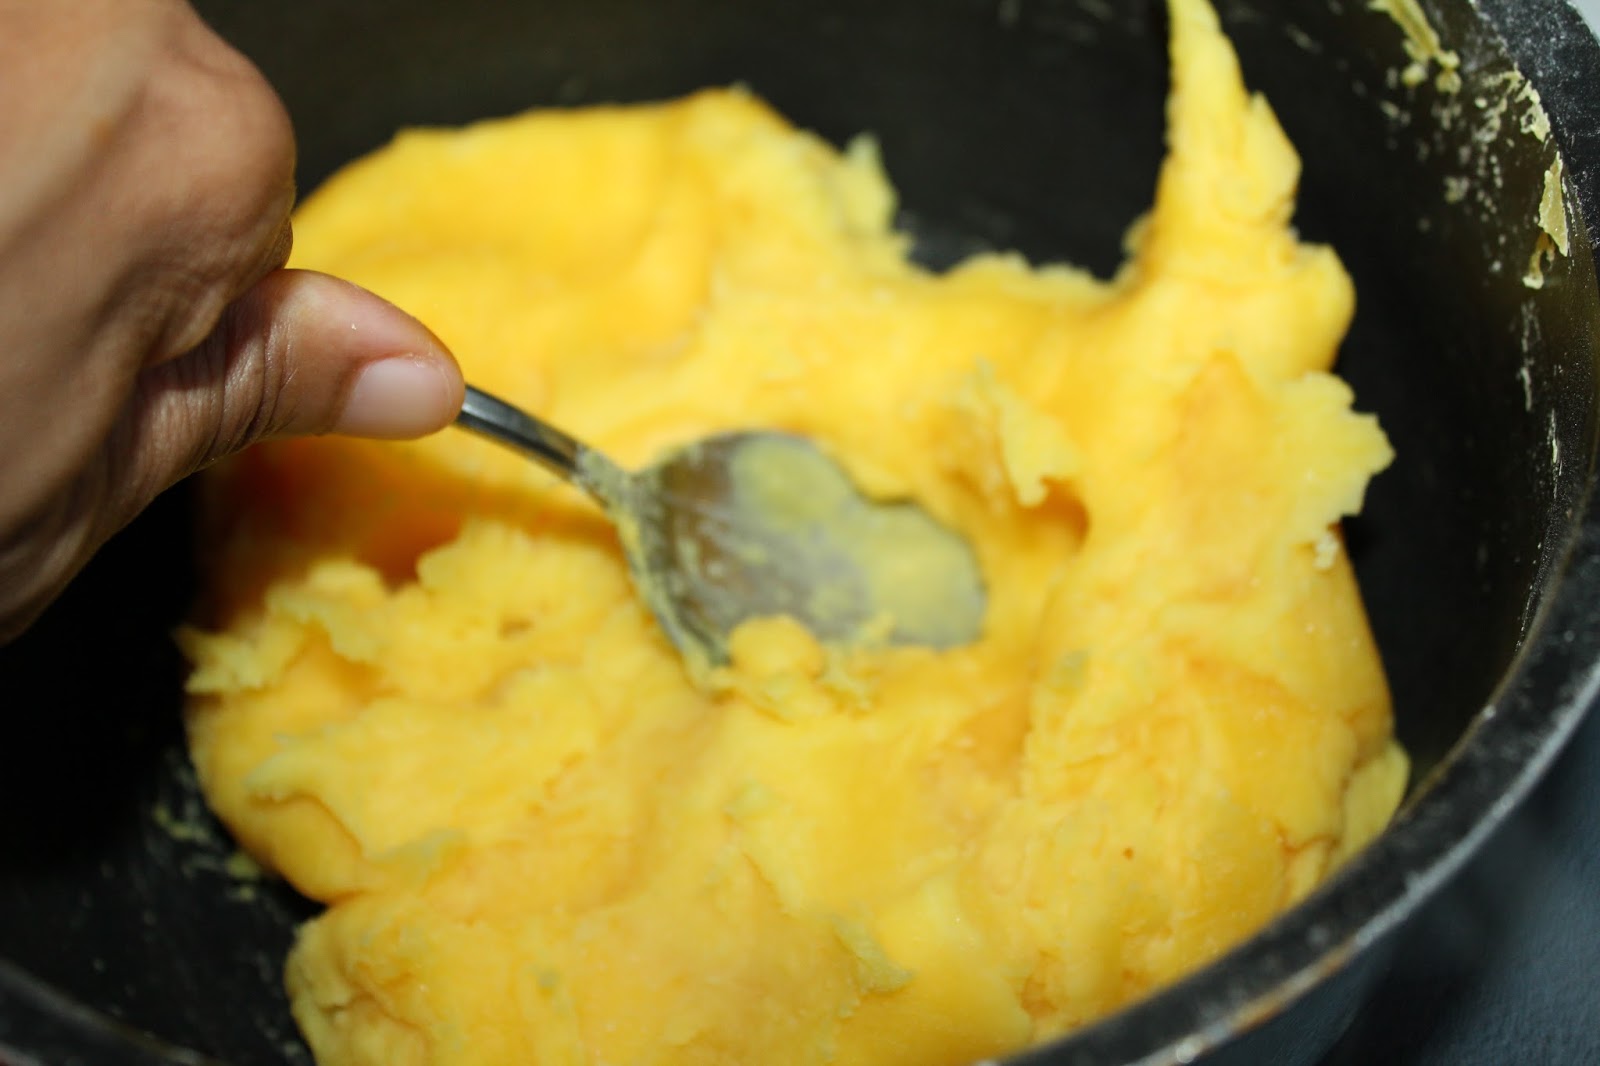
After 6 minutes cooking time. Another view of me pressing down with the spoon.

After 6.5 minutes cooking time. Flipping gets harder. The dough begins to stick to the spoon.
Flip and knock the dough off the spoon with your fingers. Be careful, it's hot.

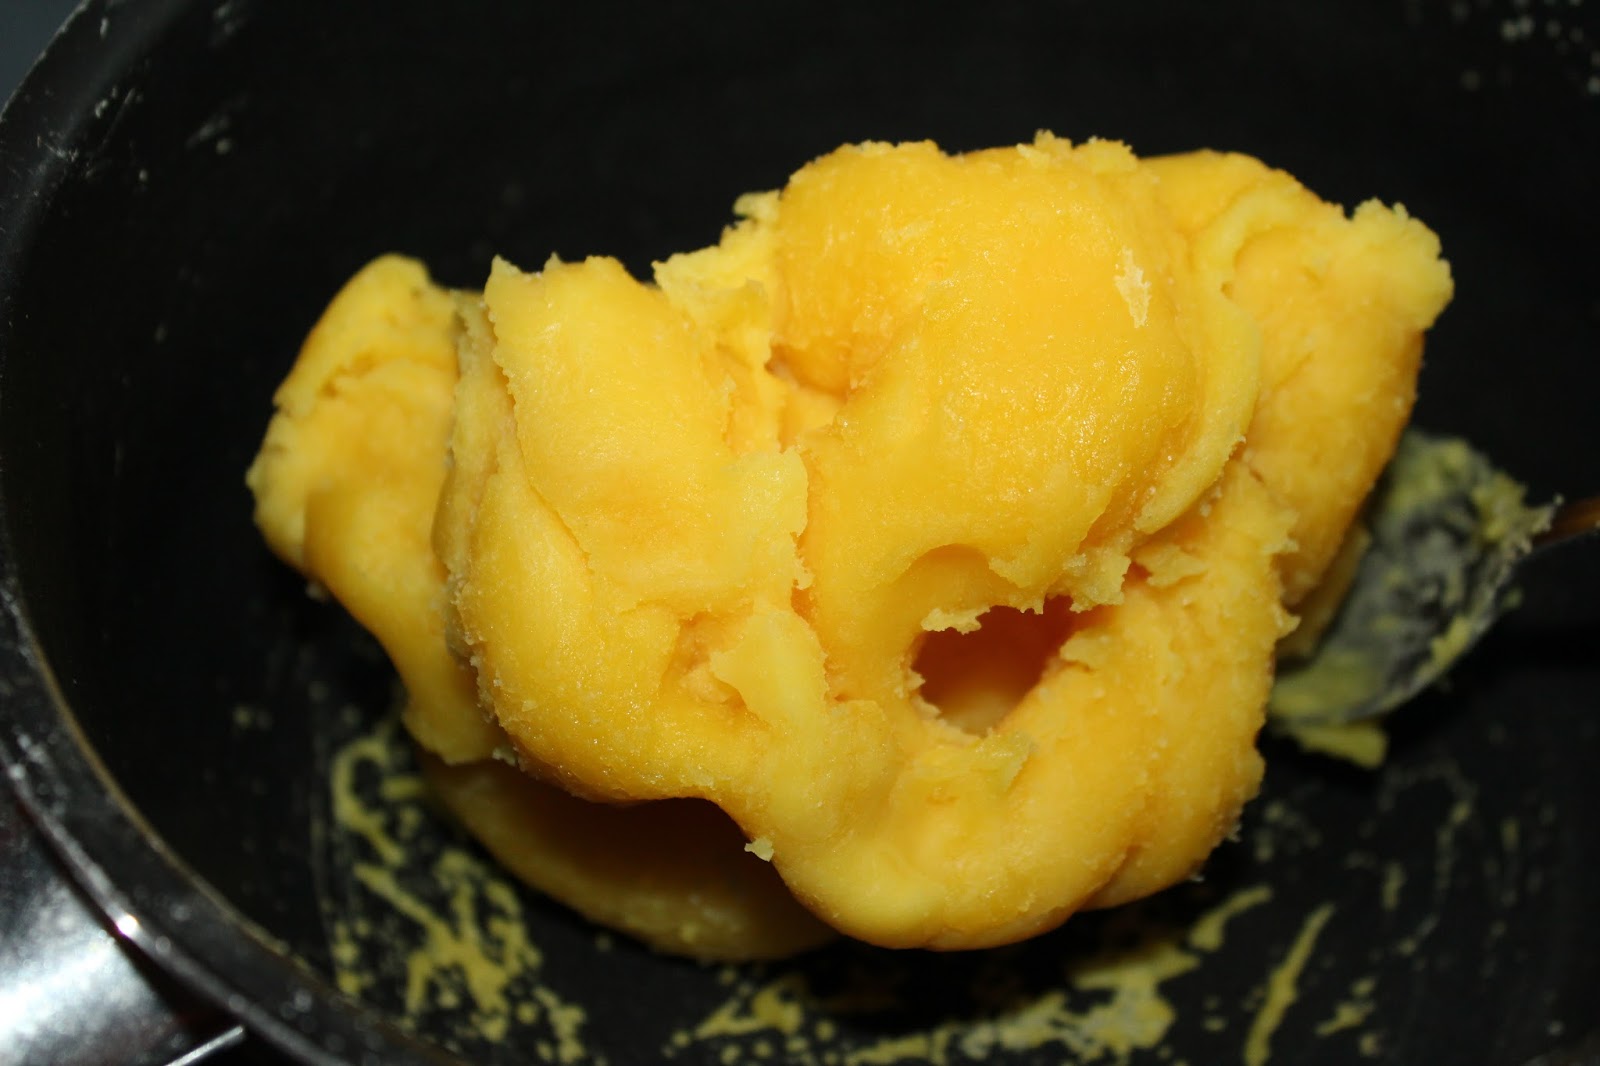
Exactly 7 minutes cooking time. I rolled it into a ball for the pic, but it was hot!

GLUTEN FREE PLAY DOUGH

1/2 c. Rice flour (I use Authentic Foods Superfine White Rice Flour)
1/2 c. Corn starch
1/2 c. Salt
2 t. Cream of tartar
1 c. Water
1 t. Cooking oil (I use canola)
Food coloring (optional)

Whisk dry ingredients together in a sauce pan. Add water, oil, and food coloring (I used approximately 9 drops of yellow to get the color you see in the photo). Cook on low heat (I cooked it at about 3 on my stove top) for 5 minutes, or until it forms a ball (I cook mine for 7 minutes, as the 3-5 minute recommendation that is recommended on other sites yielded me a very sticky and frustrating mess). Cool completely before storing in a sealable plastic bag or airtight container. My son is impatient so we often play with it warm without issue, but I do not store it until it is completely cool.


Enjoy!

Monday, August 26, 2013

Cybele Pascal's Free-To-Eat Cookies Hitting Shelves NOW!!


Everyone in my inner circle knows how much I love Cybele Pascal. She is an allergen-free baking Goddess. She is the one who wrote The Allergen-Free Baker's Handbook that I often refer to, and discussed in this post. Well, she's got some good news and I am one happy allergy-free mama!


Cybele's Free-to-Eat cookies will hit shelves in Kroger brand stores in a couple of weeks. This means Kroger, King Soopers, Fred Meyer, Ralphs, QFC, etc.


This is how she describes them, "Say Hello to the Modern Cookie: full of the flavors you crave, free of the top 8 allergens. Certified Gluten-Free, Certified Vegan, and you don't have to be allergic to love them!"


The cookies will come in chocolate chip, chocolate chunk brownie and oatmeal raisin. The true test will be if I get to trade in the old faithful Enjoy Life Double Chocolate Brownie cookies that my munchkin loves so very much, for her chocolate chunk brownie.


You can search for locations near you that sell the cookies, and sign up to find out when they will be available near you, on the Free-to-Eat site. Be sure to go LIKE her Free-to-Eat page on Facebook to keep up with news and happenings.

 
Boy do I love to see our allergy free options expanding. Yee hawwwww! I will report back once I have hit my taste buds with all of these babies!

'Til then...

Photo credit: All photos courtesy of the Free-to-Eat website and Facebook page.

Friday, August 23, 2013

The Path of Tea - A Place of Refuge

...And My Time With Jennifer Gabiola
of Dawning Soul


In 2006 when I moved back to Houston, I decided I was going to embark upon the journey of finding myself a favorite little tea house here in town where I could do my writing, reflecting and artistic work. That search led me to a number of places in town, but it came to a screeching halt when my feet landed at the place called The Path of Tea.


When I first walked through the door I thought I had accidentally stumbled into a spa somehow. It was quiet and airy, with soothing music playing and smells that I cannot even begin to describe. I literally stood there for about two minutes and looked around. 


And what was I thinking? I found it! My haven. And today I want to share it with you. That's right, YOU. It's not only a place where you can go for great organic tea, but it's a place where you can go for a respite; to replenish; to work; to think; to explore the wide world of tea; to simple BE.


Day after day, week after week, and month after month I would inundate myself with this place. I wrote; I reflected; and I worked on artistic projects, just like I had planned. I explored ideas; poured out my thoughts; pondered my purpose; shed old skin; and just sat with myself. I spent time talking to the owner, Thia McCann on occasion (God rest her beautiful soul), and I met countless interesting, eclectic and soulful people from every walk of life. This place became my refuge.


The beauty of this new found dream of a space, was that I could simultaneously learn about and enjoy tea; something I always wanted to do. Approximately 138 different kinds of tea sat on a table for me to stare at in awe; to sniff; and to belabor. Did I mention that I suck at making decisions when I have a ton of options? It’s the strangest thing. I am one of the most decisive people I have ever met, yet when presented with too many options I flounder like a fish out of water.


To make matters worse there is this beautiful red wall full of unique and artistic mugs where you go to pick the cup in which you want to enjoy your tea. Are you serious??? This little luxury is artist heaven for me, but by now I’m stressed! It's just too much. But man am I as happy as a kid in a candy store! My senses were doing a tango I didn't realize I had been missing.


So after a long and agonizing hiatus from my sacred refuge, today was the day I met up with one of the most beautiful souls at my little tea haven. Annnnnnnd, I let my favorite server, Mary, pick my mug for me. I was in one of those moods to allow as many synchronicities as possible enter my world. Being very picky about these kinds of things (I think that’s the artist in me) I was actually a little excited to see what kind of mug she chose for me. 


So there it is. A teeny tiny white little dainty something. I never choose flowers, but today I received them.


Jennifer Gabiola is the founder, Poet, Designer and Inspirational Teacher of Dawning Soul . Isn't she beautiful? We met back in April and had made plans to one day reconnect. Today was that day. In our time together we shared the most intimate and vulnerable aspects of our stories that we possibly could. We contextualized our experiences backwards and forwards, giving them meaning, purpose, and legacy power. My spirit smiled as she spoke and shared and allowed herself to just BE with me. It was therapeutic for me to have a place and space in time with a kindred spirit, to pour out a little bit of where I am right now in this very unique moment in my life.


Jennifer had the jubilee cookie. I had the allergy free muffin I brought from home. Yes, we allergy mamas always have a stash in our bag and as long as there is no food detector we are just fine ;-). For her, Mary selected the blue and white striped cylinder shaped cup. I forgot to ask Jennifer how she felt about that choice.


I told Mary that today I needed rejuvenating (it’s been a horrible allergy week for Little Ninja and mama has gotten NO sleep). Jennifer and I both wanted to do something new so we shared a large pot of the Organic Coconut Oolong Tea. It smelled like heaven and it didn’t hurt that we are both coconut fiends.


One of the most impressive things about The Path of Tea is, as it boasts, it is “Houston’s ONLY totally organic tea house and online tea store.” I know, wow, right!? Here in our own back yard.


Don’t you just love the lady in the yellow hat in the background? I chuckle whenever I look at her. She couldn’t take her eyes off of me and my camera from the time I started snapping to the time I left, LOL.

For my allergy mamas who are breast-feeding this is definitely a place for you. It's a refuge in stressful times, when you have but a moment to steal away from that beautiful baby. It is a place where you can get rejuvenated. And it is totally organic with over 135 options that include many for the breast-feeding mom to choose from.


Please do yourself a favor and go by. You won’t regret it. And please check out the Dawning Soul website. You will be amazed and inspired by Jennifer and her work. 

Have you ever been to The Path of Tea? If so, what was your experience like? If not, are you tempted to go??? I'm confident you will. Please report back when you do J.

Healthy & Moist Allergy/Gluten Free (& Vegan) Anytime Muffins


One day, over a year ago, while looking for a great muffin recipe I came across this recipe for Healthy Power Muffins, over at Go Dairy Free. I fell in love with it and Ninja and I ate it as is for the longest time.


After a while I wanted to see if I could get it a bit lighter and moister, so I began tinkering with the recipe to get it to my liking. Now don’t get me wrong, while I believe I was a chef in another life, I am NOT one of those people who can easily manipulate a recipe to success. In fact I was downright horrified to make any changes; Lord knows that allergy free products are far too expensive to waste.


But…somehow, someway I got up the nerve. First I worked on the moistness. I took a ‘lil somethin’ I learned on some other recipe for something altogether different and added it in. SUCCESS!


Then, I tackled the density. I did tons of research on flours all over again, in the attempt to see how I might tweak my go-to pancake recipe. And ding, ding, ding…another idea. Once again I added a 'lil somethin' and this time taking away a 'lil somethin' too. Aaaaaand…SUCCESS!


That was it...three modifications and I now have the muffin I absolutely love to eat. It is lighter on my palate and it is not only more moist, but it stays moister longer. That sounds like a commercial doesn’t it, “It stays moister longer,” LOL! But seriously, it does.


And so, the recipe.

Healthy & Moist Allergy/Gluten Free (& Vegan) Anytime Muffins

  • 3/4 c. Buckwheat flour
  • 1/2 c. Teff flour
  • 1/4 c. Tapioca flour
  • 1 t. ground cinnamon
  • 1 t. baking powder
  • 1/2 t. baking soda
  • 1/4 t. sea salt (can use plain salt)
  • 3 Medium-sized, ripe mashed bananas
  • 1/4 c. Organic unsweetened applesauce
  • 1/4 c. coconut oil (or your favorite baking oil)
  • 1/4 c. honey or maple syrup (or desired sweetness)
  • 1 t. vanilla extract
  • 1/3 c. Hemp seeds
  • 1/3 c. Enjoy Life mini chocolate chips 
  1. Preheat your oven to 375ºF and grease a muffin pan (can also use silicone muffin cups)
  1. In a medium-sized bowl, whisk together the buckwheat flour, tapioca flour, cinnamon, baking powder, baking soda, and salt.
  1. In a mixing bowl, blend the banana, applesauce, coconut oil, honey (or maple syrup), and vanilla (it is okay to have some small banana lumps).
  1. Fold the flour mixture into the wet ingredients, stirring until just combined.
  1. Stir in the hemp seeds and chocolate chips.
  1. Pour the batter into the muffin pan, and bake for 25 to 30 minutes, or until slightly browned on top (insert a toothpick to make sure it comes out clean, keeping in mind that the melted chocolate chips may show on the stick).
  1. Cool in the pan for 5 minutes and then place on a baking rack until cool (although I begin gobbling them right after the 5 minutes!).
Don't tell anyone but I gobble two of these babies down straight out of the oven. Don't worry, you will see why soon (and I won't tell on you either).


This is what a ripe banana looks like. Exactly!! Like the ones you usually throw away (shame on you). In the words of Jace (my lovely three year old toddler, stop doing that!!! Those are the best ones for baking! They smell and taste horrible as is, but boy oh boy do they make for some rich sweet baked goodies. Trust me. I wouldn’t steer you wrong ;-). Don't fret if you don't have bananas this ripe, just use what you have.


Here's a tip. Mix up a few batches of the dry ingredients only (except for the hemp seeds and chocolate chips, which are folded in at the end), place them in a Ziploc bag and store them in the fridge. That way "anytime" you have a hankering for some of these great muffins, it'll only take you moments to whip them up. I keep at least three batches on hand at all times. So here’s what I do:
  1. Take out three quart sized Ziploc bags and label them “Muffin Mix” or whatever you want to call it. It’s harder to label them once they are full.
  2. Begin measuring the dry ingredients, filling each bag as you go. In order to stay organized I spread the bags far enough apart that I don’t get confused. I put the same ingredient in each of the bags before moving on to the next ingredient (like Buckwheat flour, buckwheat flour, buckwheat flour…then on to teff flour).
  3. Give the bag a good 'ole shake, shake, shake.
  4. Zip them up and pop them in the fridge.
That way when you gotta have those muffins, they are only a few wet ingredients away!


As you mix your flour just make sure you don’t get as carried away as my Little Ninja does as he shakes the bags for mommy. But just in case you do, please post a pic and give us all a laugh for the day.


I call these "Anytime" muffins because we find ourselves eating them, well, anytime. Breakfast...muffin. Dinner...muffin. Wednesday...muffin. I'm happy...muffin. It's raining...muffin. I want some coffee...muffin. Thomas the Train fell off the track...muffin. Even when my toddler begs for an impromptu birthday party months after his actual birthday, full with candles, singing, presents and all (hence the photo above). But you get the point; these are truly ANYTIME muffins, people.


Enjoy!